Illustrator Software Workshop
Working With Colour...
The first thing we need to consider is which colour mode we're working with (CMYK or RGB). The mode appropriate for print is CMYK.
K stands for Key, black is the most common key colour.
Using full cyan, magenta and yellow creates a very dark brown. Black is the key colour as it is used to reinforce the dark areas / shadows. It keys together the cyan, magenta and yellow and produces a 100% black.
Make sure that your page setup is set at CMYK, not RGB as you are designing for print.

Ways of adding colour to your designs:

Swatches ^

Colour Picker ^


Colour Palette ^
Swatches are the best way to work with colour when applying colour in Illustrator.

Swatch Palette ^
If you use the Swatch Palette, you can apply the same colour consistently throughout your artwork. Every Illustrator software has the same set of default swatches installed. We don't need all these default swatches, so delete them as follows...

You can delete them one by one


Or as a whole

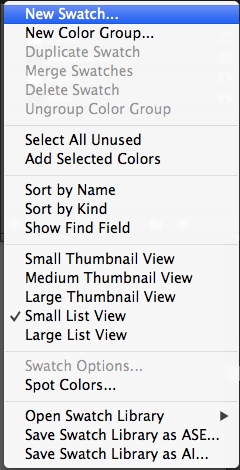
Then display your swatches in list view...

The Registration colour is used for printer's marks, e.g. crop marks, registration marks, etc.
To create a new swatch, you have the following two options...

CMYK are referred to as process colours. CMYK being the inks used during the printing process.


You can also create colour swatches using the colour palette...
Or the colour picker. But if you use the colour picker, you will need to create the swatch under the colour palette options...

You can edit your swatch by double clicking on it.
If you have already applied colour to your artwork without using the Swatch Palette, then you can add it to your swatches. You can do this by clicking on your colour picker colour and dragging it into your palette. You can also use the eye dropper to select the colour and bring it into your colour palette, then create a new swatch from the drop down menu there.
You can add every colour from the document into your swatches palette in one go! Make sure that nothing is selected in your artwork. Go to your swatches palette and under the drop down menu you can 'Add Used Colours'


The cut corner and square dotted symbols that have now shown up on the swatches means that these swatches are global swatches. The main difference between the two is if you edit one of your global swatches without anything selected, then every single object that has this swatch applied immediately updates. You are making global changes to your artwork. Swatches that aren't global swatches are called local swatches.
When you select a non global swatch, the colour palette allows you to edit the ink percentages using the sliders.

However, when you select the global swatch, the colour palette shows a different option. A tint slider. If you want to edit the CMYK percentages of a global swatch, you have to double click on the swatch.

You can then set up a number of swatches that are tints of the same ink mixture. You can only set up tints of global swatches. You can't do this with local swatches.


If you now edit the 100% swatch (the original colour), then all of the tints will change to suit this colour update.


✿✿✿✿✿✿✿✿✿✿✿✿✿✿✿✿✿✿✿✿✿✿✿✿✿✿✿✿✿✿
There is another way that colour can be printed...
Spot Colours
A colour that is printed with it's own ink - not using CMY or K.
Using spot colours can make the print job significantly cheaper, because you are using one ink rather than up to four. However if you use both CMYK and spot colours in the same print job, it will make things more expensive due to using the four CMYK inks plus new spot inks.
Spot colours allow consistency - this is useful when printing logos, for example the Sainsbury's logo is always the same colour, due to using the same spot colour each time it's printed.
You can print colours that aren't printable using CMYK, for example metallic inks or fluorescent inks.
The Pantone Colour Reference System is the main set of spot colours that we will use. You can use this to find unique reference numbers to choose the colour that you wish to print. The printer has a recipe version of these so that s/he can add the right amount of pigments together to create the colour you've asked for.
To bring up Swatch books...

Then choose the correct book, for example PANTONE + Solid Uncoated

To make this easier to find your colour, switch the listing view...


Then use the find field to find your colour... eg 108 c

To add this colour to your swatch palette, just click on it in your pantone library..

You can identify that this colour is a spot colour by it's name (never change the name, this is the only way that the printer knows what colour to mix), also the cut corner contains a spot. The global square icon also contains a spot circle.
This colour reference system only works in Commercial Print. You can't really reproduce the same colours at college as all the printers here use CMYK. When working commercially, you should get a print proof from the printers to approve that the colours are correct.
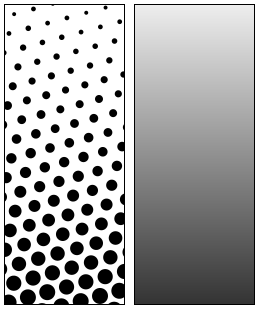
You can also create tints of the Spot Colour...


To create colours with tints, spot colours are printed in spots, but half-toning, his means you can use the same ink for every tint, but the spots will just be separated further than the darker colours. This makes printing cheaper.
The swatch palette created is for this document only. When you set up a new document, the swatch palette will reset back to the default swatches. You can save this palette so that you can access it from another Adobe file.
Save the swatch palette as AI if you want to save it to work with it again in Illustrator. Don't change the location of the swatch file, but you can change the name.


This won't open up in your swatch palette, it will open up a new palette similar to the Pantone one opened previously.

To use the swatch library in another piece of software, you save it as an ASE (Adobe Swatch Exchange).

But make sure you save this swatch in the same file that you're working from for Photoshop or InDesign, as it will take ages to try and find the swatch if you save it in the default Illustrator file, for example save it in user work. You won't be able to save all the tints, however.

Then you can load these swatches in photoshop...


