Prior to the lesson we were asked to bring in 3 scamps to show how our homepage could look for our website. In the lesson we were asked to lay these out on the table and then give each other feedback for about 10 minutes or so.
My feedback was as follows:
- I think the one in the top right corner could work well, it is unusual with the logo set to the right hand side which makes it interesting and stand out. Good effect with logo and text overlaid over the big image. Perhaps a bit restrictive though only to be able to show one image.
- Clear navigation.
- Prefer the top left because of the central layout and use of symbols on buttons.
- Image in the background could potentially change?
- The top right design makes for a unique visual experience but bottom right might be more suitable

If the above error message appears when you open up Dreamweaver, click 'Manage Sites...', then select the site that you want to work with, click on the pencil icon and then click on the folder icon to navigate to where your root folder now is.
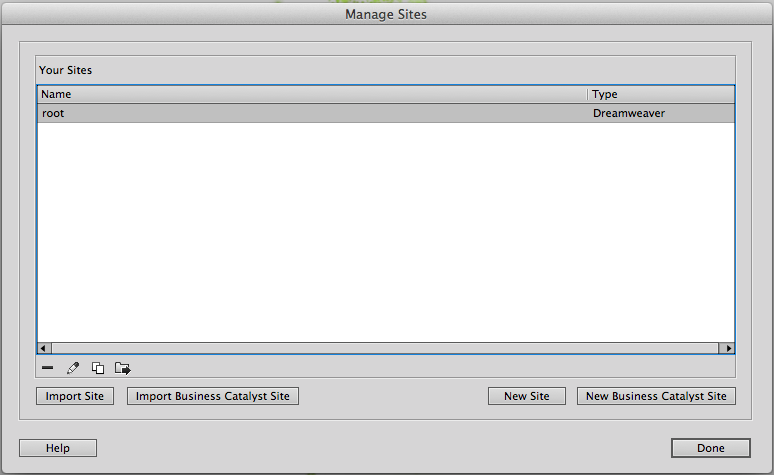


You need to do this every time you're working on a website and the root folder has been moved. Otherwise you won't be able to save things to the same location every time.
You will know if you've done this correctly if it lists your root folder in the files panel on the right hand side of the screen.

Make sure that you always open files from the files panel, don't use the welcome screen. You can do this by double clicking on index.html file

Remember that every time you make a change to your website, save it and preview it in your web browser.
We are now going to create a CSS document. To do this, go File... New... Blank Page, CSS, Create...


You can only ever view the code of CSS, not the design in Dreamweaver. This is because a CSS document isn't closely linked to design elements like HTML. We're looking at CSS coding today, because it has many advantages over HTML. We will create all the design and formatting in the stylesheet.css document so that it can be linked to every page and transfer the code over to every page to keep the layout, fonts, colour etc the same.

The first line of code tells us what keyboard we will use, and the second line of code is just a note telling us what the document is. We can create notes to ourselves about what types of codes there are all the time. To write a note to yourself you write /* then write your note, and then to close the note use */
The first code we're going to create is a generic code.
To create the body code you type body { as soon as you press {, it brings up a drop down menu of all the code you can use in CSS...

You can write all the tags onto one line, but this can be confusing and hard to edit in the future. So make sure that you place tags on each line, so that it separates the coding out and is easier to read. Press 'return' and press F, then select font-family and press return. This will list all the standard font families.


Choose which font you want to use and press return. Then close this code by pressing semi-colon ; and then press return and close the body code with }


Then save your document as stylesheet.css in your root folder, so that you can easily find it later. This should now be listed in the files panel on the right hand side of the screen.


To link the style sheet to the HTML documents, you don't want to hand code it. So you use Dreamweaver to make this link. You will use the CSS Styles panel.

Click on the button that looks like a link...

And find your stylesheet document, and click OK...


This will bring up a <link href=> code before the </head> tag, as this is something that formats the functionality of the website.


Then click File, Save All...
Then, when you preview your website in your web browser, the font should have now changed to the font you chose in your .css document.

We are now going to change the design of the website...
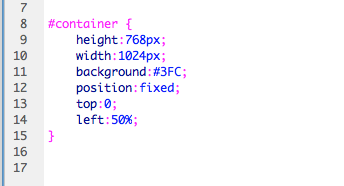
We are going to start with the most basic form, so work with a fixed size, rather than responsive, with the dimensions of width: 1024px and height: 768px. This will create a box at this size, which you can call whatever you want. BUT, we are going to call this box either container or wrapper. The reason behind that is because it contains everything / wraps around everything. This box is going to be a div id with the name #container.
Click on stylesheet.css

Click after the } after the body and press return twice. This makes it easier to read the code.
Now we will create our div id. Alt+3 = #
So type #container or #wrapper, then press the space bar, then { and press return...
And type the following...


We will now add a background colour to check that this is working.

Click on Color... and then choose your web safe colour to test...

Then remember to close your code setting with a }

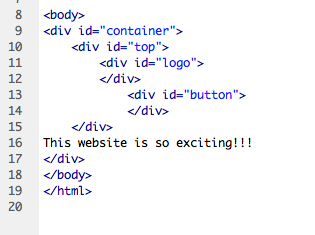
Save the .css document, click on Source Code to go back to the HTML and then after the <body> tag, press return, then <div id="container">, then you want to close your open div tag with </div>. Make sure that everything in your body tag is within this!

Now, when you preview your website in your web browser you should see that the css worked!!

To alter the position of the text, type position: and then choose fixed as we want to use a fixed position.


You can then get rid of the original 10px border by typing top:0; also by typing left:0; you can get rid of the border on the left.


Then when you refresh the page in your web browser, the container should now reach the top and left hand sides of the browser.

In regards to the alignment of the container, you can either have it aligned to the left or the centre for this session. This coding for the centre is a lot trickier.
To get the container centre aligned, you have to do it using measurements. We cannot give it a specific measurement to get it aligned bang in the centre as the browser window could be bigger on some computers. We will move the left edge across 50%.
However, this has now moved the left edge into the centre of the window...

You will need to move the container -512px (half of the container width size) to the left.


For navigation, we can have it aligned to the left or the top.
So to align the navigation to the top, we need to think about the height. We could use 100px, 150px or 200px for standard alignment. We chose as a class to create it at 150px high.
So, type the following...


The basic area for the website is now created. We now need to create sections in the website. We will start with the logo.
Make sure that you create your logo within the following guidelines on Illustrator..

If you want your background to the logo to be a solid colour, never do this in Illustrator! We can specify solid colours in dreamweaver, and this uses up no file size. When saving for the internet, you need to make sure that your file sizes are as small as possible so that they load quicker. So work with transparent backgrounds!


This is where you do your image compression.
Choose what type of image you want. JPEG does not support transparency, this will make your background white. You need to use either GIF or PNG for your logo. Save it as a PNG-24 with the transparent background option ticked.
Then save this in your root folder, under your images sub folder.


In the style sheet on Dreamweaver type the following... (the position is relative to the top of the container, and will relate itself to other images added to the design. Typing float:left; means that the logo will align to the left of the relative position)


You need to make sure that you add this css div to your HTML code with <div id="logo"> Remember to add the </div>!!!


For the navigation buttons, we don't need to create 4 different buttons. We just need to create the container for them and then call them 4 times. You cannot work with half pixels, so we will create them all at 218px wide and 150px high.
In Illustrator, create another new document. Type the navigation for the home, and then duplicate the layer. Change how you want this text to look when you rollover it.


Save the first layer as home1 and the second layer as home2. Then in dreamweaver you need to specify the width, the height and the position. You won't call in the background-image as we will need to use Javascript to enable rollover.
Before adding Javascript coding, line up your div tags using the tab button so that you can see that they are closed, to make it easier to read.

Then create the button div tag...
We will now add our Javascript roll over button code inside the button div tag.


The rollover text should now work!

